


Efficiently pack a 40L hiking backpack?
Why Smart Packing Matters for a 40L Pack
A 40-liter hiking backpack is often the sweet spot for multi-day trips, offering enough space for essentials without the bulk of larger packs. However, its compact size means efficient packing isn’t just a suggestion—it’s crucial for comfort, balance, and easy access to your gear on the trail. A poorly packed backpack can lead to an uncomfortable carry, back pain, and wasted time rummaging for items. Learning to optimize every inch ensures a more enjoyable and safer hiking experience.
The Core Principles of Efficient Packing
Before you even start stuffing, understand the fundamental rules that govern effective backpack organization:
- Weight Distribution: Heavy items should be placed close to your back and centered between your shoulder blades. This keeps the pack’s center of gravity high and tight, preventing it from pulling you backward or swaying.
- Accessibility: Items you’ll need frequently (rain gear, snacks, map) should be easily accessible, ideally in the top section or external pockets. Items you won’t need until camp (sleeping bag, extra clothes) can go deeper.
- Volume Utilization: Every crevice and gap is valuable. Fill small spaces with socks, underwear, or food items. Compress clothing and sleeping bags using stuff sacks or compression straps.
Zone by Zone: What Goes Where?
Think of your 40L pack as having distinct zones, each with an optimal purpose:
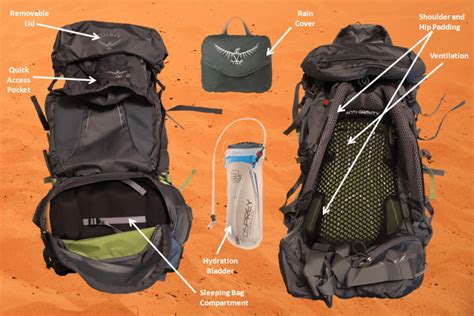
The Bottom Zone (Less-Needed Bulk)
This is where you’ll stash bulky items that you won’t need until you set up camp. A sleeping bag is the prime candidate here, often fitting perfectly into a dedicated bottom compartment if your pack has one. Camp clothes, extra socks, or a lightweight inflatable pillow also fit well at the bottom, providing a soft base for heavier items above.
The Core/Middle Zone (Heavy & Dense)
This is arguably the most critical zone for comfort. Place your heaviest and densest items here, snuggled against your back. This includes your water reservoir (if using an internal sleeve), food for the trip, a stove and fuel, and heavier cooking pots. Keeping these items centered and close to your spine prevents the pack from sagging and minimizes strain on your shoulders and lower back.
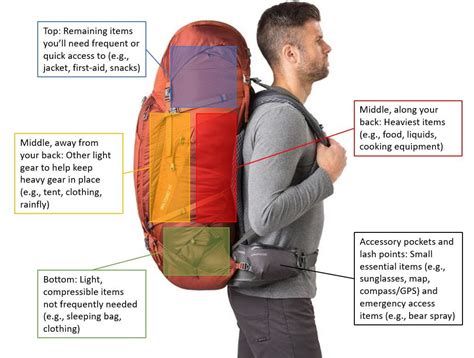
The Top Zone (Quick Access Essentials)
Anything you might need during a quick stop on the trail belongs here. Rain gear (jacket and pants), your first-aid kit, a few snacks, your navigation tools (map, compass, GPS), a headlamp, and a small water filter are ideal for this easily accessible area. For packs with a top lid, this space is invaluable.
External Pockets & Lid (Small Items & Hydration)
Utilize your pack’s external pockets for items you need instantly. Side pockets are perfect for water bottles or trekking poles when not in use. A front stash pocket can hold a wet rain jacket or a guidebook. The lid pocket (if present) is excellent for sunscreen, lip balm, sunglasses, bug spray, a small camera, or your wallet and keys.

Compression and Organization Hacks
- Stuff Sacks & Dry Bags: These are your best friends for organizing and compressing clothing, sleeping bags, and other soft goods. Dry bags also offer crucial protection against moisture.
- Roll Your Clothes: Rolling rather than folding saves space and minimizes wrinkles.
- Fill All Gaps: Use small, soft items like socks, underwear, or even food bags to fill any empty spaces within the main compartment. This prevents items from shifting.
- Utilize External Straps: For items that don’t fit inside or are wet (like a sleeping pad or tent), external compression straps can secure them to the outside of your pack. Always ensure they are balanced and don’t create snags.
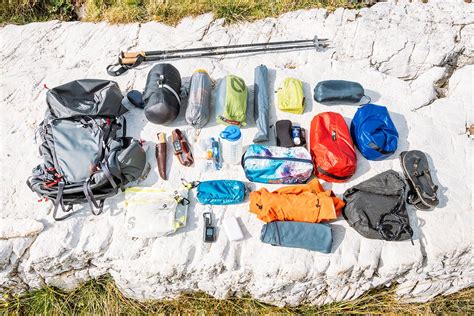
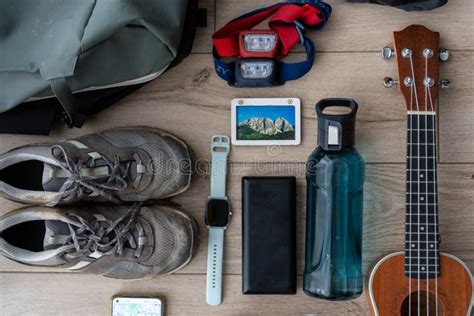
Before You Pack: The Lay-Out Method
Before putting anything into your backpack, lay all your gear out on the floor. This visual inventory helps you confirm you have everything you need and, more importantly, identify anything you don’t. Scrutinize every item: Do you truly need it? Can you leave it behind or substitute it with a lighter alternative? Once you’ve culled the unnecessary, you can begin the strategic packing process, knowing exactly what needs to fit.
Conclusion
Mastering the art of packing your 40L hiking backpack is a skill that improves with practice. By adhering to core principles of weight distribution and accessibility, strategically utilizing the different zones of your pack, and employing smart compression techniques, you’ll achieve a balanced, comfortable carry. A well-packed backpack means less fatigue on the trail, quicker access to essentials, and ultimately, a more enjoyable and efficient hiking adventure.